How to Cook a Standing Rib Roast in the Oven: A Culinary Guide

The standing rib roast, often hailed as prime rib, is a show-stopping centerpiece known for its rich, beefy flavor and tender texture. The generous marbling within the roast renders during cooking, basting the meat from the inside out and creating a self-saucing effect. A properly cooked rib roast boasts a deeply savory crust and a juicy, melt-in-your-mouth interior.
This guide will walk you through the reverse sear method, a technique favored by professional chefs for its ability to achieve even doneness throughout the roast while developing a beautiful, flavorful crust. We'll cover everything from selecting the right cut to carving and serving, ensuring your rib roast becomes a culinary triumph.
Understanding Standing Rib Roast
A standing rib roast is cut from the rib section of beef, typically spanning from the sixth to the twelfth rib. What makes this cut so special is the "standing" rib bones which act as a natural roasting rack. This allows heat to circulate evenly around the meat, preventing the bottom from becoming soggy and ensuring a more consistent cooking temperature. When shopping, consider these factors:
- Grading: Look for USDA Prime or Choice grades. Prime roasts will have more marbling (intramuscular fat), contributing to richer flavor and tenderness. Choice is still a good option, offering a balance of quality and price.
- Bone-in vs. Boneless: While boneless roasts are easier to carve, bone-in roasts provide extra flavor and moisture as the bones conduct heat to the meat.
- Size: Estimate about one pound of bone-in roast per person. A 4-rib roast (8-10 lbs) will feed approximately 8-10 people.
Why Cook Rib Roast This Way?
- Versatility: The standing rib roast is incredibly versatile. It can be served simply with salt, pepper, and herbs, or elevated with complex sauces and sides.
- Flavor: Roasting on the bone imparts a deep, savory flavor that permeates the entire roast. The rendered fat creates a rich, beefy jus that’s irresistible.
- Convenience: While it requires time, the reverse sear method is relatively hands-off. The low-temperature roasting ensures even cooking, minimizing the risk of overcooking.
Preparation (Mise en Place)
Before you even think about turning on the oven, proper preparation is key:
- Thawing: If frozen, thaw the roast in the refrigerator for several days (allow 24 hours for every 5 pounds). Never thaw at room temperature.
- Trimming (Optional): Most roasts come pre-trimmed, but you may want to trim any excessively thick layers of fat, leaving about 1/4 inch for rendering.
- Pat Dry: Use paper towels to thoroughly dry the surface of the roast. This promotes browning.
- Scoring (Optional): Lightly score the fat cap in a crosshatch pattern to encourage even rendering and crisping.
- Bring to Room Temperature: Allow the roast to sit at room temperature for at least 2 hours (but no more than 4). This helps it cook more evenly.
Essential Tools
- Roasting Pan with Rack: The rack elevates the roast, allowing for even air circulation.
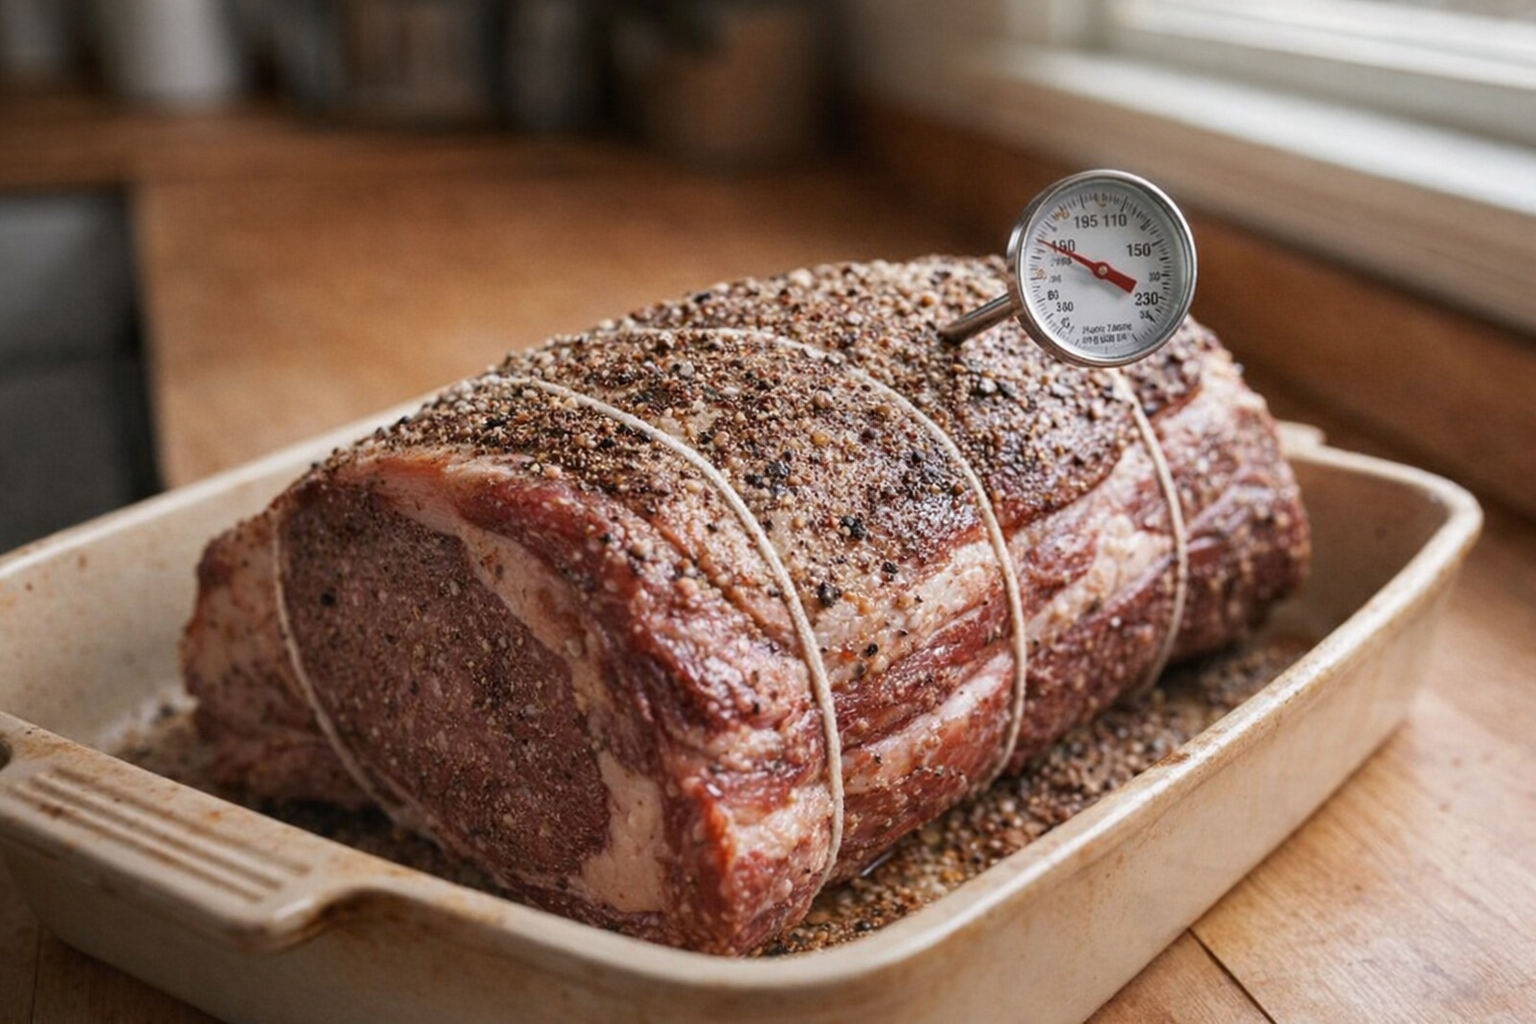
- Meat Thermometer: A reliable meat thermometer is essential for accurate temperature monitoring. An instant-read thermometer or a probe thermometer are both excellent options.
- Kitchen Twine: Used to tie the roast, ensuring a uniform shape during cooking.
- Carving Knife: A long, sharp carving knife is crucial for slicing the roast smoothly.
The Cooking Method: Reverse Sear
The reverse sear method involves slow-roasting the rib roast at a low temperature until it reaches the desired internal temperature, then searing it at a high temperature to create a crispy crust.
H2 Reverse Sear Standing Rib Roast
Ingredients:
- 1 standing rib roast (4-7 ribs, 8-14 pounds)
- 2 tablespoons kosher salt
- 1 tablespoon freshly ground black pepper
- 4 cloves garlic, minced (optional)
- 2 tablespoons olive oil or softened butter (optional)
- Fresh rosemary and thyme sprigs (optional)
- Preheat the Oven: Preheat your oven to 250°F (120°C). Ensure your oven rack is positioned in the center.
- Season the Roast: Generously season the roast on all sides with kosher salt and freshly ground black pepper. If using, rub with minced garlic and olive oil or softened butter. Tuck rosemary and thyme sprigs under the twine, if desired. The aroma of the herbs will subtly infuse into the meat.
- Roast: Place the roast, bone-side down, on a rack in a roasting pan. Insert a meat thermometer into the thickest part of the roast, avoiding the bone. Roast until the internal temperature reaches your desired doneness (see chart below). The low heat ensures even cooking and prevents the edges from drying out.
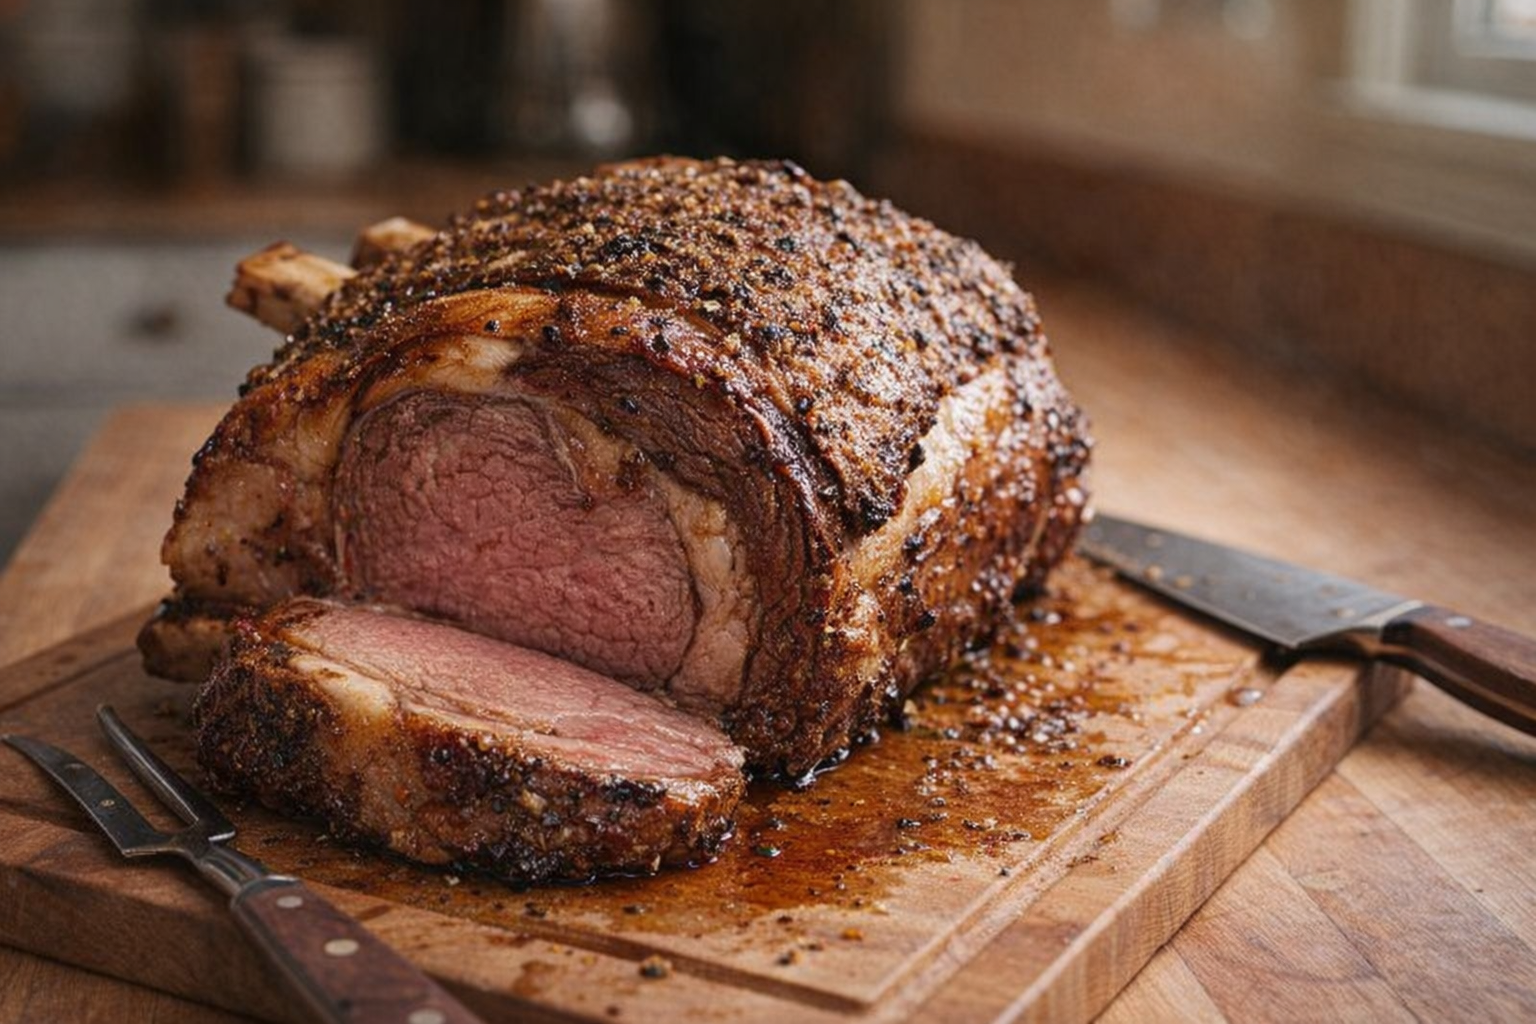
- Rest: Remove the roast from the oven and tent it loosely with aluminum foil. Let it rest for at least 30 minutes. During this time, the internal temperature will continue to rise by about 5-10 degrees, and the juices will redistribute throughout the meat. Don’t skip this step!
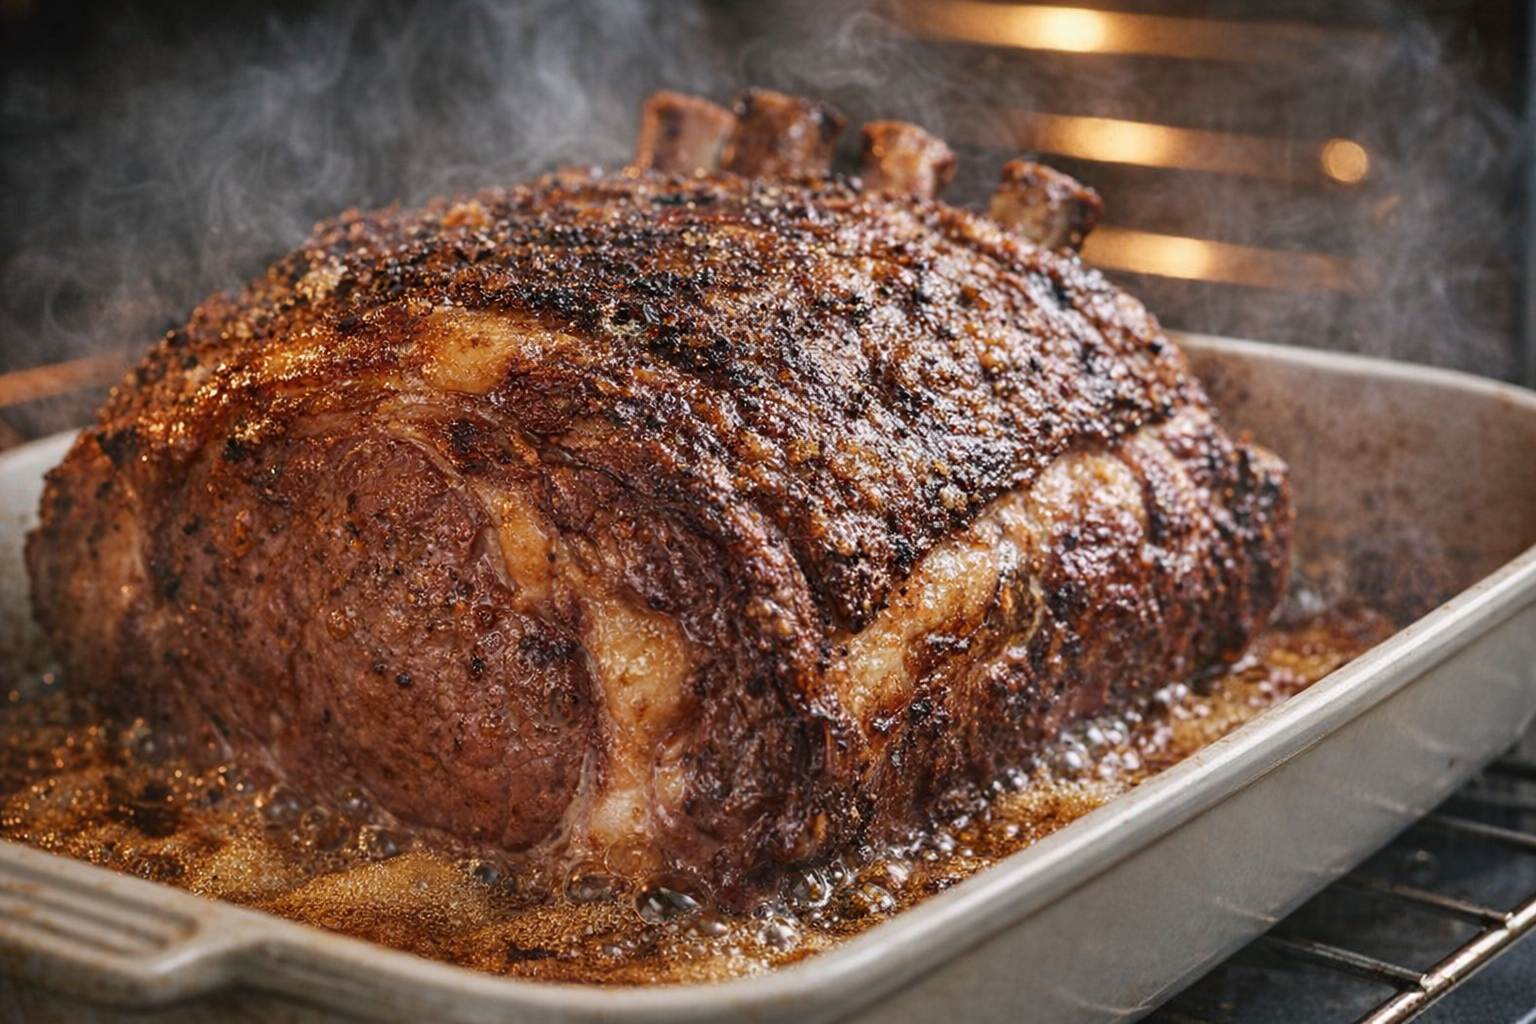
- Sear: Increase the oven temperature to 500°F (260°C). Return the roast to the oven and sear for 10-15 minutes, or until the crust is deeply browned and crispy. Watch carefully to prevent burning. The high heat rapidly creates a beautiful, flavorful crust.
- Rest Again: Remove the roast from the oven and let it rest for another 10 minutes before carving.
Cooking Time & Doneness Guide
Use a reliable meat thermometer to ensure accurate doneness. Insert the thermometer into the thickest part of the roast, avoiding the bone.
| Doneness | Internal Temperature (After Resting) | Visual Cues |
|---|---|---|
| Rare | 125-130°F (52-54°C) | Very red center, soft to the touch. |
| Medium-Rare | 130-135°F (54-57°C) | Bright red center, slightly firmer to the touch. |
| Medium | 135-145°F (57-63°C) | Pink center, noticeably firmer. |
| Medium-Well | 145-155°F (63-68°C) | Slightly pink center, firm to the touch. (Not recommended, as the roast will be less tender) |
| Well-Done | 155°F+ (68°C+) | No pink color, very firm. (Not recommended, as the roast will be dry and tough) |
Visual Cues
While a thermometer is best, you can also use visual cues. Press the roast gently with your finger. Rare will feel very soft, medium-rare will be slightly firmer, and medium will be noticeably firm.
Tips for Perfection
- Don't Overcrowd the Pan: Ensure there is enough space around the roast for air to circulate. Overcrowding will lead to uneven cooking.
- Use a Reliable Thermometer: Invest in a good quality meat thermometer for accurate temperature readings.
- Don't Skip the Resting Period: Resting allows the juices to redistribute, resulting in a more tender and flavorful roast.
- Carve Against the Grain: Carving against the grain shortens the muscle fibers, making the meat easier to chew.
Storage & Reheating
- Storage: Store leftover roast in an airtight container in the refrigerator for up to 3-4 days.
- Reheating: Reheat slices of roast gently in a skillet with a little beef broth or au jus. Avoid microwaving, as it can dry out the meat.
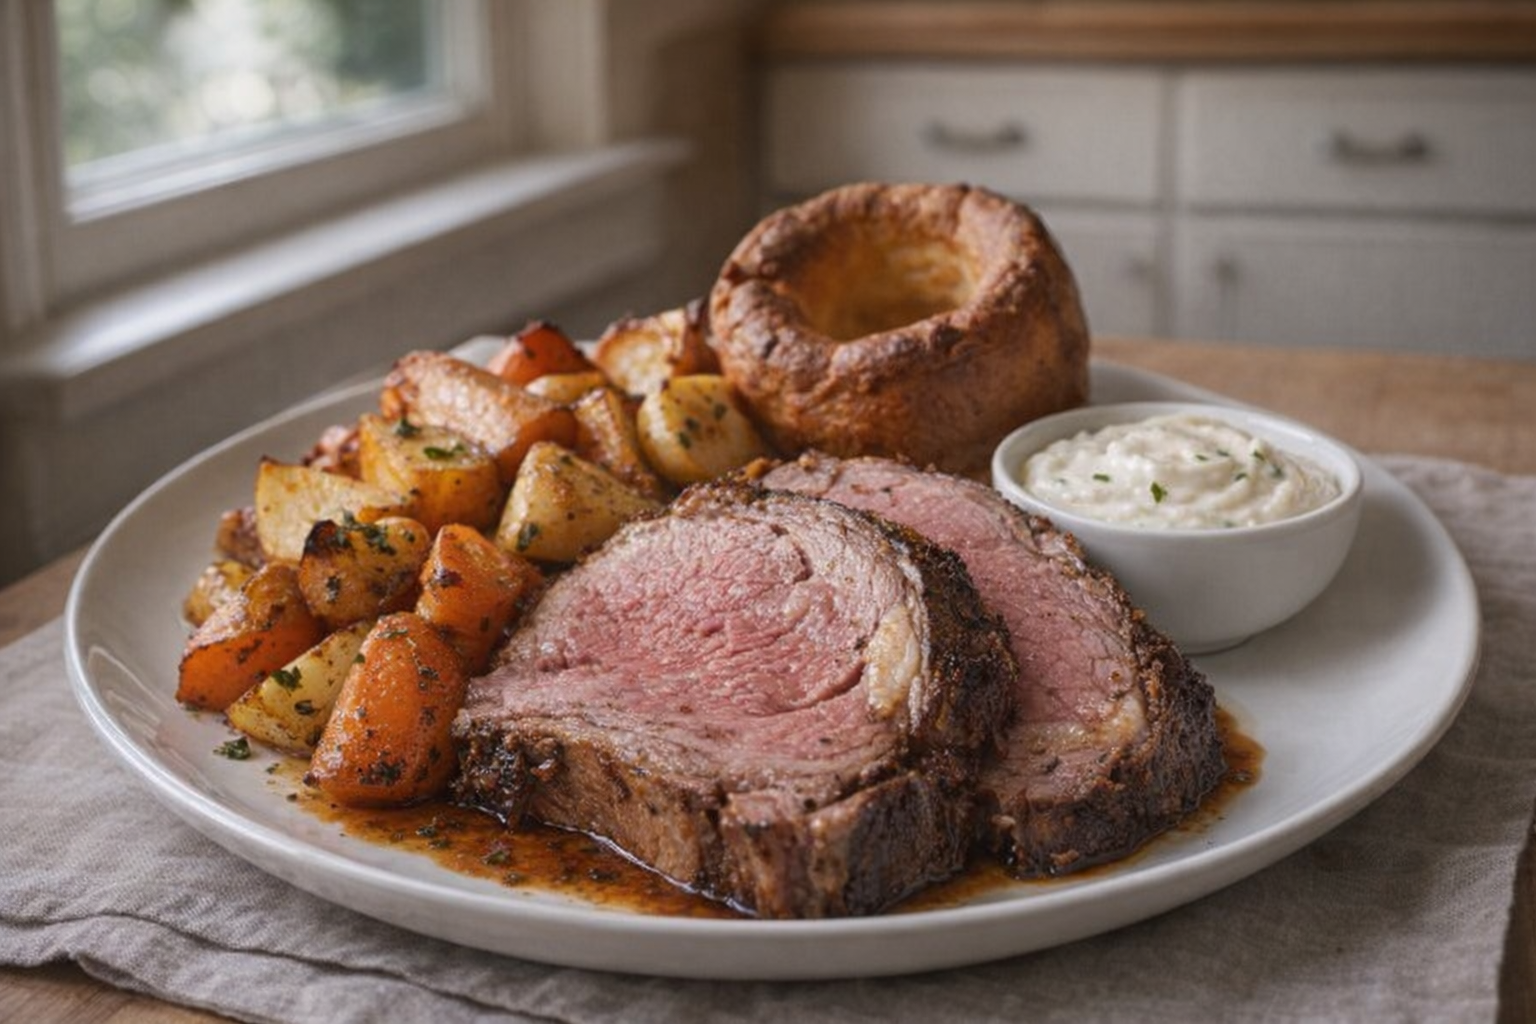
Serving Suggestions
- With Yorkshire Pudding: A classic pairing, the Yorkshire puddings are perfect for soaking up the rich jus.
- With Creamy Horseradish Sauce: The tangy horseradish cuts through the richness of the beef.
- With Roasted Root Vegetables: Carrots, potatoes, and parsnips make a hearty and colorful accompaniment.
- As a Luxurious Sandwich: Thinly sliced rib roast on crusty bread with horseradish mayo is a decadent treat.
Frequently Asked Questions
While Prime or Choice are recommended for optimal marbling and flavor, a Select grade roast can still be delicious. Just be extra careful not to overcook it, as it will have less fat to keep it moist, and consider basting it with pan juices during the roasting process.
Allow the roast to rest for at least 20-30 minutes after cooking, loosely tented with foil. Resting allows the juices to redistribute throughout the meat, resulting in a more tender and flavorful roast instead of them running out when you carve it.
Yes, you can definitely season the roast the night before! This allows the salt and other seasonings to penetrate the meat, resulting in a more flavorful roast. Just be sure to wrap it tightly and store it in the refrigerator until ready to cook.
Store leftover rib roast in an airtight container in the refrigerator for up to 3-4 days. To prevent it from drying out, consider storing it in some of the pan juices or gravy.